How to Install the Correct and Safe Car Horn Relay
As is known, the function of a car horn is to give a signal to road users or other motorists when they want to go faster, or to warn of danger. Inside the horn component there is a relay that functions to connect the battery to the electric current in the car.
Relays on cars can also be used as a solution to one of the factors that causes the horn to turn off. Given that the function of the relay is quite important, you must know how to install the horn relay. The following will explain how to install a car horn relay that is correct and safe.
Before installing the horn relay on the car, you must prepare the following equipment.
- Relay sockets
- The cable is a thick strand type with a diameter of about 5mm
- Fusebox
- Connector terminal (try to match the electric current load on the car you are using)
- Ring terminals with a size of 10mm
After you have prepared some of the equipment, now is the time for you to enter the horn relay installation process. Here's how to install the correct and safe horn relay.
1. Installation of the relay on the negative voltage system
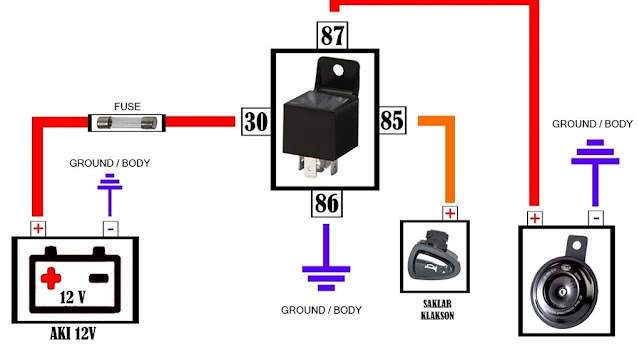
When you want to install a relay in a negative voltage system. Then you have to attach the relay leg (number 30) to the positive pole of the battery. At the time of installation, you must use a thick cable and must be attached directly to the battery.
Furthermore, the relay leg (number 87) must be attached to the positive pole of the car horn. For the installation of this relay, you can use a cable with a thick or medium thickness. For that, you must know the location of the car horn fuse code and its meaning.
2. Installation of the relay on the positive voltage system
The mechanism for installing the relay in a positive voltage system is almost the same as installing it in a negative voltage system. You can do the installation starting from the relay leg (number 30) towards the positive pole of the battery.
Next, install the relay leg (number 87) to the positive pole of the horn. Next, install the relay legs (numbers 87 and 85) on the car horn cable.
You need to know, the installation of relay feet usually depends on the brand of the relay. Therefore, you must be careful before buying it. Make sure you always pay attention to the number printed on the relay leg before carrying out the installation process.
Benefits of Installing a Horn Relay on a Car
Here are some of the benefits you get when you install a horn relay on a car.
Reducing resistance to electric current so that the performance of the electromagnetic components in the car can function optimally.
Making the sound of car horns louder thus increasing the security and safety of car drivers. A loud horn can give a quicker signal to other road users or motorists. So that they can more quickly find out where you are on the road, especially in an emergency or critical situation.
Can function to test the car's electric current thereby extending the life of the electromagnetic components in the car. Extend the life of the car switch because the relay can connect and disconnect too much electric current.
Now you are much more familiar with the functions of the horn relay on a car. Seeing the methods taught above, do you understand how to install the correct horn relay?
If you feel you are not an expert, you can immediately take your car to the nearest Daihatsu workshop or dealer to install the horn relay. Make sure you always check the condition of your car horn and other components to minimize any damage that occurs.


Posting Komentar untuk "How to Install the Correct and Safe Car Horn Relay"